A clipping path is fundamentally a shape that demonstrations like a cover or mask. So anything created under the shape can visible and anything outside it is hidden. It’s an extremely helpful method for showing only the bits of a graphic that you need to show, for example, concealing out the unessential background or concentrating on a particular segment of a bigger picture. Clipping paths are additionally much of the time used to control text wrap around the design.
InDesign can run with clipping paths that are in the form of a transported TIFF, JPEG, Photoshop EPS or Photoshop file. On the other hand, with clipping paths, you make in InDesign. In addition, regardless of the origin of the clipping path, InDesign gives you a chance to alter it.
Making Clipping Paths in Photoshop
Making a clipping path in Photoshop is easy after you get the hang of the procedure. (Check out the Photoshop Bible series for additional on making clipping paths in Photoshop.) The path is basically a selection, which you can make with any of the Photoshop selection tools. That includes following your own particular choice to hand drawing a path. After you make the selection, here are the means by which you make a path.
Utilizing Clipping Paths in InDesign
Clipping paths permit you to cover the piece of a picture you would prefer not to show up on the page. Consider it like an editing tool. However, without remaining inside the limits of a section a rectangular or square box. Anything inside the section way will be noticeable. However, anything outside of it will be transparent. Yes, you heard me right. Transparent. As in undetectable, hidden, and – in particular – ready to give other page components a chance to stream over top without being avoided from visibility. You can also rely on some of the services of Clipping Path Associate in finishing your tasks.
Now, you’re most likely asking, “So, where have clipping paths been my entire life, and how might I begin?” Glad you asked.
Beginning

The most effortless approach in adding a clipping path to a picture is to make the path in Photoshop. After that, import the picture into InDesign with the clipping path as of now set up. Utilize the Path device in Photoshop to make the way, spare the picture as a TIFF, EPS, or PSD document, and import it into InDesign with the section way as of now set up (File > Place). Select Apply Photoshop Clipping Path on the Import Options dialog box and InDesign will then clip the picture in like manner.
The easiest way to add a clipping path to an image is to create the path in Photoshop, then import the image into InDesign with the clipping path already in place. Use the Path tool in Photoshop to create the path, save the image as a TIFF, EPS, or PSD file, and import it into InDesign with the clipping path already in place (File > Place). Select Apply Photoshop Clipping Path on the Import Options dialog box and InDesign will then clip the image accordingly.
Refining the Path
Subsequent to inserting the picture, you can change its clipping path reasonably effortlessly by choosing the picture you need to clean utilizing the direct selection tool. The clipping path you imported will then show up. Select and move any points along this way to reshape the picture and sharpen the edge. As you modify the clipping path, extra subtle elements from the source picture will be covered up or uncovered.
Changing over the Path to a Frame
Once you’re done calibrating your path, you can change it to a standard edge by picking Object > Clipping Path > Convert Path to Frame. This will secure the path for you.
Pick Your Own Path

InDesign will give you a chance to pick any path made in Photoshop as the clipping path. To pick a path, highlight the chosen picture and pick Object > Clipping Path > Options. Select the Photoshop Path choice from the Type menu in the exchange box that shows up. In addition, after that pick a path from the rundown. See your choice, and select OK when you’re done.
You can make a clipping path InDesign utilizing a drawing tool, here is the ticket:
• Select the File→ Place then scan to find a picture.
• With the drawing tool, create a path appropriate on the highest point of the picture. (The way ought to be made for it to contain the picture)
• With the Selection instrument, snap to pick the picture then pick File→ Cut.
• Select the shape you made in Step 1 and pick Edit→ Paste Into.
Making clipping path in your picture will give you a simple time doing your altering work. With the clipping path InDesign, your photograph will upgrade better.
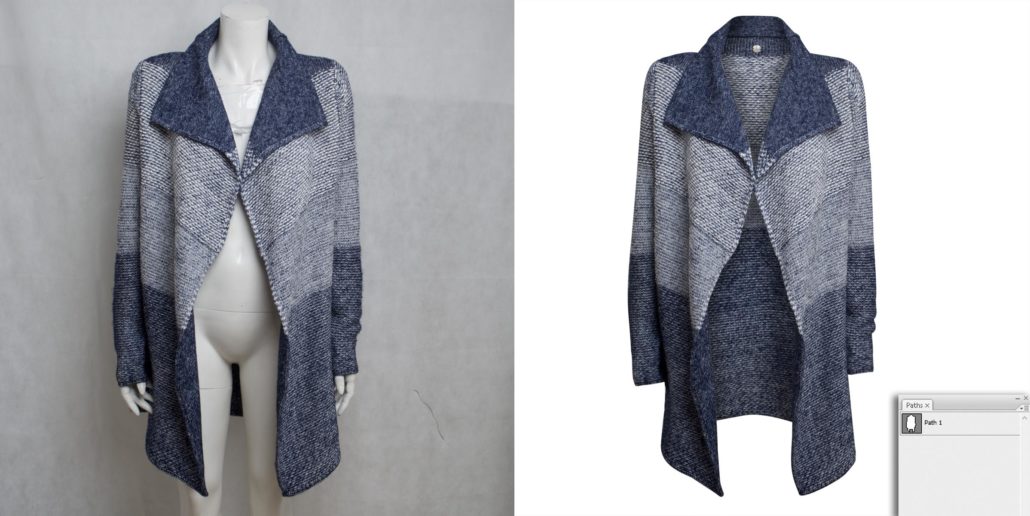
Step 1
InDesign can utilize any media that can spare a clipping path or alpha channel. For instance a TIFF or PSD. It is convenient to utilize EPS setup. The main errand is to ensure that the graphic contains a clipping path by opening it in Photoshop. Open the Paths palette which can be found by going to Window > Paths, here you will have the capacity to see a path on the off chance that one has been made. On the off chance that a way is required and you are indeterminate on the most proficient method to make one look at the brilliant services. Generally spare your record as your favored configuration.

Step 2
Alright back to InDesign. Open a current file or for the reasons for this, make a New Document. Put your picture by going to File > Place. Explore to where it is stored, select it once, then Open and select inside the location to save it.

Step 3
Subsequent to placing, the picture ought to even now be chosen, if not utilize the Selection Tool to choose by clicking once on it.
Step 4
Go to Object > Clipping Path > Options.
Step 5
Inside the Clipping Path drifting board open the Type drop-down menu and select Photoshop Path. Next, pick the Preview tick box to see the Clipping Path.
You will see that specifically under the Type menu sits the Path menu. On the off chance that you happen to have more than one path is saved in the graphic, this is the place you pick what path to utilize. At last, select OK.
Step 6
The path ought to be chosen and highlighted chestnut. Additionally, the Direct Selection Tool ought to be dynamic. With this tool, you can change the path. Basically, tap on one of the focuses to change, or to enact the handles for altering bends.
Step 7
As the path is currently, an InDesign path you can include and erase focuses utilizing the Pen Tool. Guarantee that the path is highlighted by utilizing the Direct Selection Tool, pick the Add Anchor Point Tool and snap anywhere on the path to include a point. In addition, you can utilize the Delete Anchor Point Tool to expel focuses by tapping on them.
Step 8
Since the Path is finished, you now have the alternative to change the Clipping Path to an edge. To do this, select the present casing with the Selection Tool and go to Object > Clipping Path > Convert Clipping Path to Frame.
If you are getting confused, I recommend using the help of professionals like Clipping Path Associate. It is a wiser decision.
Adjusting Clipping Paths
Regardless of whether the path was foreign made or made in InDesign, you can transform it by picking an alternate choice in the Text Wrap board—Detect Edges, Alpha Channel, Photoshop Path, or User-Modified Path—than was chosen already. What’s more, you can alter the clipping path physically, as you can whatever other freestyle shapes.

Erasing Clipping Paths
Regardless of whether the clipping path was transported in or made in InDesign, you can evaluate it by picking none as the Type in the Clipping Path exchange box. (For a foreign made graphic, erasing the clipping path in InDesign does not devastate the first path in the graphic’s source record.)
Take note of: The Clipping Path summon works extremely well for pictures that have a white or light foundation yet no clipping path. It is less helpful for representation with foundations that contain an expansive scope of blending qualities.
After you’ve made the clipping path, you can utilize it either to cover the picture (by changing it to an edge) or to control text wrap—just as you can with an imported clipping path.
Conclusion
I prescribe that you explore different avenues regarding diverse pictures and paths inside Photoshop and place them in InDesign. You will find a few pictures work superbly and others depend on the additional abilities that lone Photoshop offers to accomplish an exact Clipping Path. So start designing!